Hi. I hope you are finding the lessons easy to follow. Now that we know how to access data from a web service, we should take a look at accessing data from a database . I will be using ADO.net here to get data to the web service. This is very important, because most of our applications will be storing their data in databases, and our application needs to access this data.
We will be covering the following topics in this lesson:
1) Connecting to database
2) Accessing a single value, and range of data
3) Handling data into Custom classes.
4) Inserting into the database
Step 1: Connecting to a database.
1) Create a new Silverlight Project, and name it Lesson8.
2) Add a WCF service as a new project to the solution and name it DatabaseService1
3) Open the Service1.svc.cs
You can observe that some namespaces are added by default to the code.
To access data from the database, specifically SQL Server, we need to add the following namespaces:
System.Data;
System.Data.SqlClient;

4a) The System.Data namespace contains the DataTable and related classes, that are used to store the data retrieved from the database.
4b) The System.Data.SqlClient namespace contains the classes specific for accessing data from Sql Server.

5) Now, we need to establish a connection to the Sql Server, and access data from a database.
6) Now , there is a Tool for using Sql Server, Microsoft Sql Server Management Studio, that comes with Microsoft Sql Server 2008 . Go to Start Menu -> Microsoft Sql Server 2008 -> Management Studio.

7) To the left of the screen, you will find Object Explorer pane. You can create a new Database in it by clicking on Databases- > New database

8) A prompt opens for the Database name. Name it Sample Data , and press ok.

9) In the object explorer pane, now expand the databases tab to find the newly created Sample Data database. Expand it to find the Tables group. You can right click on it and Add a new Table.

10) Let us create a table called Users, with three fields, Name, emailid and Password . the data type for all the 3 fields is varchar(50) . Uncheck the Allow Nulls checkbox.

11) Save the table by pressing Ctrl+S . A prompt appears for the table name. Name it Users
12) Now in the Object Explorer, go to the Sampledata database, then to tables group and expand it. You should see the dbo.Users table present there. Right click on that and select "Edit top 200 rows"

13) Now you should be able to enter sample data there.
14) Note the name of your server. It is present in the tab above the sample data here.

Thats all we want with sql Server Management studio. Save it and we can go back to Visual Studio now.
Step 2a: Accessing a Single value
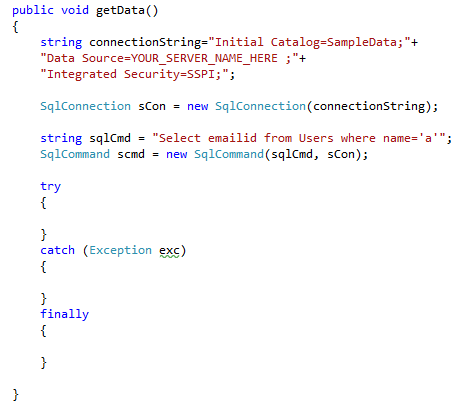
1) In the Service1.svc , create a new method public void getData()
 2) Inside this, we first need to connect to the Sql Server database, so we use the SqlConnection class to create this. Add the following code in the getData() method. Change the YOUR_SERVER_NAME_HERE
to your Server name.
string connectionString="Initial Catalog=SampleData;"+"Data Source=YOUR_SERVER_NAME_HERE ;"+"Integrated Security=SSPI;";SqlConnection sCon = new SqlConnection(connectionString);
Initial catalog refers to your Database name.
Data Source is your server name
The authentication is default windows authentication, so we use Integrated Security=SSPI
If your database has a username and password, then you can use
Userid="user_name" ; Password="Password"
For now, we will use this above connection string.
3) We need to execute a Command to get data from the database. So we will create a SqlCommand to get the data. Add the following code
stringsqlCmd = "Select emailid from Users where name='a'";SqlCommand scmd = new SqlCommand(sqlCmd, sCon);
4a) We enclose our entire data access code within a try - catch- finally block, so that any exceptions can be handled.
4b) Add the following code after the above statements
try {
}
{
} catch (Exception exc) finally {
}
Your code should look something like this now

5) The sqlCmd query returns a single value, the email id of the user with name 'a'. Since it is a single value, we can use the ExecuteScalar method of the SqlCommand object.
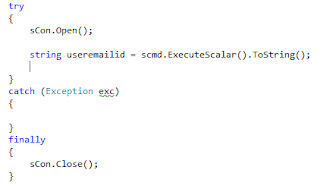
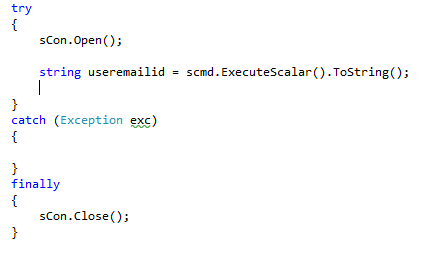
6a) Before you run the SqlCommand, you need to open the connection to the database. So add the following code .
string useremailid = scmd.ExecuteScalar().ToString();
6b) In the above lines, the connection to the database is opened, and a query for fetching a single value is executed. that value is sent into the useremailid variable.
6c) We need to close the connection now, so we will close it in the finally block.
Your code should now look like this
Step 2b: Accessing a range of Data
1) To store a set of values, we need to have a data table , what can hold the data.
So instead of a string variable we have a DataTable object.
2) So first let us modify our query. We will select all the user names and passwords from the Users table.
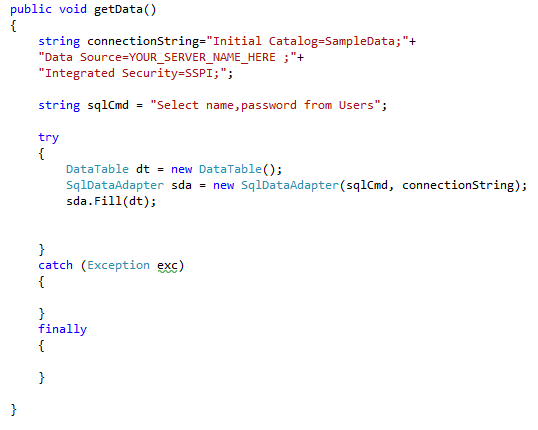
3a) Now , inside the try block, we want to create a new DataTable object, and a SqlDataAdapter object.
the SqlDataAdapter gets the range of data and stores it in the DataTable.
Add the following code to the try block
sda.Fill(dt);
Add the following code to the try block
3b) Notice that we dont need to open the sql connection. The SqlDataAdapter automatically opens the connection and closes it. That means you can remove the sCon object as well as sCon.Close(); also.
The final code should look like this. DataTable dt = new DataTable();
SqlDataAdapter sda = new SqlDataAdapter(sqlCmd, connectionString);
string sqlCmd = "Select name,password from Users";
We wont be using the SqlCommand object , scmd , to fetch the range of data , so you can remove it.

4) The data table now contains all the names and passwords of the users.
Step 3: Handling data into custom classes
1) Now we have to handle this data temporarily .We will create a custom class classed MyUsers, and store this data into it . Add the following code to the IService1.cs.
[DataContract]
public class MyUsers
{
string username;
string password;
}
2) Now right click on the variables and select Refactor->Encapsulate Field.
string username; string password;

3) Now a prompt appears for the name. Press Ok.
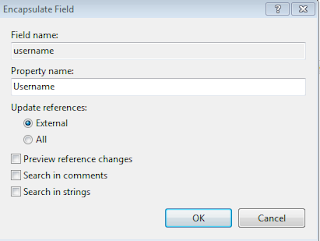
4) Repeat the procedure for the email id variable also.
5) Your custom class is ready.

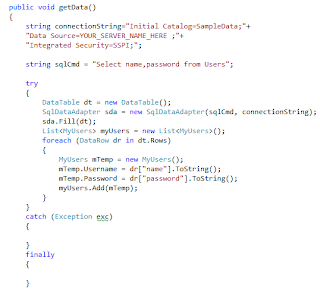
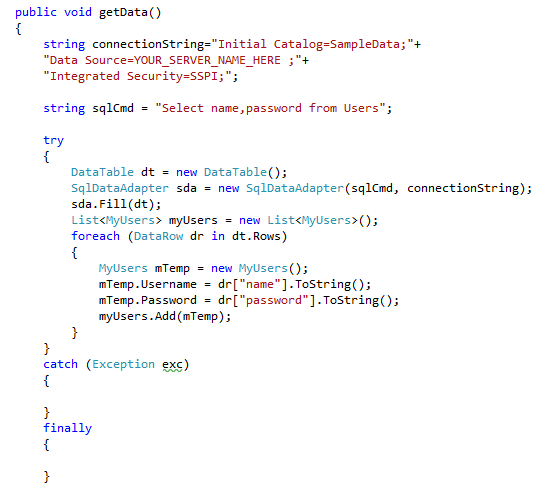
6) Now we need to assign the data into objects of this class. Go to the try block in Service1.svc.cs , where you have filled data into the data table. We can create a list of type MyUsers, which will store the data.
List<MyUsers> myUsers = new List<MyUsers>();
foreach (DataRow dr in dt.Rows)
7) In the above code, we are looping through each row of the data, using the foreach loop . Create a new object of type myusers, and add the data from the data row into it.
MyUsers mTemp = new MyUsers();
mTemp.Username = dr["name"].ToString();
mTemp.Password = dr["password"].ToString();
myUsers.Add(mTemp);
8) This ensures that all the data from the data table is converted into the class objects, and stored in that list.
9) If you have to pass this data to silverlight, you need to change the return type of the getData() method to List<MyUsers> and return the myUsers object. Your final code should look like this
10) Also, you need to add the following code in the iService1.cs under the interface iService1

This is how we get data from the Database.
Step 4: Inserting into the database
1) We make use of the SqlConection and SqlCommand classes to perform the insertion.
Since this insert statement is not a query, i.e, we are not fetching data from the database,
we can use the ExecuteNonQuery() method of the SqlCommand.
2) Add a new function insertData() and the following code to it.
public void insertData() string connectionString = "Initial Catalog=SampleData;" + "Data Source=YOUR_SERVER_NAME_HERE ;" + "Integrated Security=SSPI;";
{
string sqlCmd = "insert into Users values('h','h','h')"; SqlConnection sCon = new SqlConnection(connectionString);
try
{
sCon.Open();
int status= sCmd.ExecuteNonQuery();
}
{
} SqlCommand sCmd = new SqlCommand(sqlCmd, sCon); catch (Exception exc) finally {
sCon.Close();
}
}
As you can notice, the only difference between this insert and fetching the single value data is the ExecuteNonQuery() and the ExecuteScalar().
3) The number of rows changed will be stored in the variable status. If this insert is successful, then status=1.
This is how we access data from the SqlServer database into our web service, and from this web service into our Silverlight application. We will see more of this in the video.
We will be covering the following topics in this lesson:
1) Connecting to database
2) Accessing a single value, and range of data
3) Handling data into Custom classes.
4) Inserting into the database
Step 1: Connecting to a database.
1) Create a new Silverlight Project, and name it Lesson8.
2) Add a WCF service as a new project to the solution and name it DatabaseService1
3) Open the Service1.svc.cs
You can observe that some namespaces are added by default to the code.
To access data from the database, specifically SQL Server, we need to add the following namespaces:
System.Data;
System.Data.SqlClient;
4a) The System.Data namespace contains the DataTable and related classes, that are used to store the data retrieved from the database.
4b) The System.Data.SqlClient namespace contains the classes specific for accessing data from Sql Server.
5) Now, we need to establish a connection to the Sql Server, and access data from a database.
6) Now , there is a Tool for using Sql Server, Microsoft Sql Server Management Studio, that comes with Microsoft Sql Server 2008 . Go to Start Menu -> Microsoft Sql Server 2008 -> Management Studio.
7) To the left of the screen, you will find Object Explorer pane. You can create a new Database in it by clicking on Databases- > New database
8) A prompt opens for the Database name. Name it Sample Data , and press ok.

9) In the object explorer pane, now expand the databases tab to find the newly created Sample Data database. Expand it to find the Tables group. You can right click on it and Add a new Table.
10) Let us create a table called Users, with three fields, Name, emailid and Password . the data type for all the 3 fields is varchar(50) . Uncheck the Allow Nulls checkbox.

11) Save the table by pressing Ctrl+S . A prompt appears for the table name. Name it Users
12) Now in the Object Explorer, go to the Sampledata database, then to tables group and expand it. You should see the dbo.Users table present there. Right click on that and select "Edit top 200 rows"
13) Now you should be able to enter sample data there.
14) Note the name of your server. It is present in the tab above the sample data here.
Thats all we want with sql Server Management studio. Save it and we can go back to Visual Studio now.
Step 2a: Accessing a Single value
1) In the Service1.svc , create a new method public void getData()

to your Server name.
string connectionString="Initial Catalog=SampleData;"+"Data Source=YOUR_SERVER_NAME_HERE ;"+"Integrated Security=SSPI;";SqlConnection sCon = new SqlConnection(connectionString);
Initial catalog refers to your Database name.
Data Source is your server name
The authentication is default windows authentication, so we use Integrated Security=SSPI
If your database has a username and password, then you can use
Userid="user_name" ; Password="Password"
For now, we will use this above connection string.
3) We need to execute a Command to get data from the database. So we will create a SqlCommand to get the data. Add the following code
stringsqlCmd = "Select emailid from Users where name='a'";SqlCommand scmd = new SqlCommand(sqlCmd, sCon);
4a) We enclose our entire data access code within a try - catch- finally block, so that any exceptions can be handled.
4b) Add the following code after the above statements
try {
}
{
} catch (Exception exc) finally {
}
Your code should look something like this now
5) The sqlCmd query returns a single value, the email id of the user with name 'a'. Since it is a single value, we can use the ExecuteScalar method of the SqlCommand object.
6a) Before you run the SqlCommand, you need to open the connection to the database. So add the following code .
string useremailid = scmd.ExecuteScalar().ToString();
6b) In the above lines, the connection to the database is opened, and a query for fetching a single value is executed. that value is sent into the useremailid variable.
6c) We need to close the connection now, so we will close it in the finally block.
Your code should now look like this
Step 2b: Accessing a range of Data
1) To store a set of values, we need to have a data table , what can hold the data.
So instead of a string variable we have a DataTable object.
2) So first let us modify our query. We will select all the user names and passwords from the Users table.
3a) Now , inside the try block, we want to create a new DataTable object, and a SqlDataAdapter object.
the SqlDataAdapter gets the range of data and stores it in the DataTable.
Add the following code to the try block
sda.Fill(dt);
Add the following code to the try block
3b) Notice that we dont need to open the sql connection. The SqlDataAdapter automatically opens the connection and closes it. That means you can remove the sCon object as well as sCon.Close(); also.
The final code should look like this. DataTable dt = new DataTable();
SqlDataAdapter sda = new SqlDataAdapter(sqlCmd, connectionString);
string sqlCmd = "Select name,password from Users";
We wont be using the SqlCommand object , scmd , to fetch the range of data , so you can remove it.
4) The data table now contains all the names and passwords of the users.
Step 3: Handling data into custom classes
1) Now we have to handle this data temporarily .We will create a custom class classed MyUsers, and store this data into it . Add the following code to the IService1.cs.
[DataContract]
public class MyUsers
{
string username;
string password;
}
2) Now right click on the variables and select Refactor->Encapsulate Field.
string username; string password;

3) Now a prompt appears for the name. Press Ok.

4) Repeat the procedure for the email id variable also.
5) Your custom class is ready.

6) Now we need to assign the data into objects of this class. Go to the try block in Service1.svc.cs , where you have filled data into the data table. We can create a list of type MyUsers, which will store the data.
List<MyUsers> myUsers = new List<MyUsers>();
foreach (DataRow dr in dt.Rows)
7) In the above code, we are looping through each row of the data, using the foreach loop . Create a new object of type myusers, and add the data from the data row into it.
MyUsers mTemp = new MyUsers();
mTemp.Username = dr["name"].ToString();
mTemp.Password = dr["password"].ToString();
myUsers.Add(mTemp);
8) This ensures that all the data from the data table is converted into the class objects, and stored in that list.
9) If you have to pass this data to silverlight, you need to change the return type of the getData() method to List<MyUsers> and return the myUsers object. Your final code should look like this
10) Also, you need to add the following code in the iService1.cs under the interface iService1
This is how we get data from the Database.
Step 4: Inserting into the database
1) We make use of the SqlConection and SqlCommand classes to perform the insertion.
Since this insert statement is not a query, i.e, we are not fetching data from the database,
we can use the ExecuteNonQuery() method of the SqlCommand.
2) Add a new function insertData() and the following code to it.
public void insertData() string connectionString = "Initial Catalog=SampleData;" + "Data Source=YOUR_SERVER_NAME_HERE ;" + "Integrated Security=SSPI;";
{
string sqlCmd = "insert into Users values('h','h','h')"; SqlConnection sCon = new SqlConnection(connectionString);
try
{
sCon.Open();
int status= sCmd.ExecuteNonQuery();
}
{
} SqlCommand sCmd = new SqlCommand(sqlCmd, sCon); catch (Exception exc) finally {
sCon.Close();
}
}
As you can notice, the only difference between this insert and fetching the single value data is the ExecuteNonQuery() and the ExecuteScalar().
3) The number of rows changed will be stored in the variable status. If this insert is successful, then status=1.
This is how we access data from the SqlServer database into our web service, and from this web service into our Silverlight application. We will see more of this in the video.
No comments:
Post a Comment